I moved my blog away from WordPress, building a self-hosted one using top modern technologies like React Remix, server-side rendering, and the edge computing.
I want something small and joyful to code and blog with total creative freedom, putting my grain of sand to bring back an indie Internet that empowers people to do good.
With this post, I want to introduce you to the main pieces this website is built upon (like the server) and how to put them together to run it. This is the high-level architecture of the website.
By setting things up the way I do, you have something fairly easy, efficient, secure, and modern, which then you can use as the basis of your own website.
And you know this works because you are reading from it.
Specifically, I focus on setting up the project and CloudFlare as a way to learn by example, leaving the low-level architecture, or how does my website internally work for another post.
I assume you Docker a bit.
What I want for my personal website
The goals of this project are:
- Give myself something basic that I can easily understand (e.g., posting in Markdown files).
- Have something highly customizable that does not meddle in my way, so I have full creative control.
- Allow complex UIs only when needed (e.g., some blog posts require complex graphs or tables)
- Something I can self-host, because
there is no cloud, it is just someone else’s computer
and I want to control my data—it is fun and cheap too. - Lightweight to users, because people have unstable connections and
the
Internet has become a bloated mess
. - I find coding and blogging fun.
If some resonate with you, then keep reading.
The high level architecture
Considering these goals, I decided to build the blog with the following architecture, which I detail and explain how to set up in the following sections:
- A free CloudFlare App that has:
- The busta.win domain.
- A CDN Cache that serves the blog to users. As the blog is mainly static files, the majority of times users hit only this cache, reducing access to our server drastically.
- Zero Trust, a service that creates a secure tunnel between the server and the Internet without having to configure routers or firewalls.
- A lightweight computer
(a Raspberry Pi 4 in my case)
running a Docker Compose with two services:
- Cloudflared, which connects the self-hosted website to the Zero Trust.
- An Express server serving the web. When the user accesses the website, Express calls React Remix to render the UI and the posts from the Markdown files.
Let us see in the following sections how to set up these pieces.
The cloudFlare App
In an ideal world, we would not need Cloudflare, as we would serve the website "the old way," connecting the server directly to the Internet by opening ports in the router.
However, this is insecure
, and
in my case, my lightweight computer is not powerful enough to handle traffic spikes.
Moreover, we have to set up HTTPS and many other details better
to avoid in the beginning.
We can use CloudFlare for free to handle all of the above, which is more simple and secure than
doing it ourselves. As a drawback, they become a man-in-the-middle
, so we lose some
control of our data.
Cloudflare becomes our proxy.
We set up CloudFlare by adding a website:

Cloudflare has a guide on how to add a site.
The Domain
The domain is registered with CloudFlare, so we avoid touching any DNS settings. Of course, we can use any domain registrar and point the domain to Cloudflare.
Zero Trust
Once we have a website, we can link the website to our self-hosted server using Zero Trust. Zero Trust is a service to control access to our self-hosted server, so we mainly have to do two steps:
- Create a policy that allows anyone to access our website.
- Create the tunnel connecting the website to our self-hosted server.
Create a policy that allows anyone to access our website
- Enter into Zero Trust and complete the onboarding by choosing a free plan.
- Once you are in the Zero Trust dashboard, go to Access → Applications and click on Add an
application.

Adding an application. - Select Self Hosted and click Next.
I left the defaults, configuring only the domain to be
busta.win.
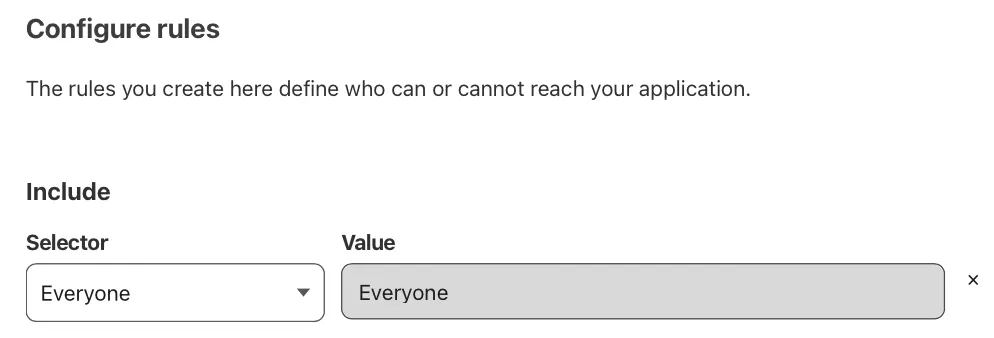
Configuring the domain. - Create a policy that allows everyone to access the website.

Creating a public policy. 
Setting the policy for everyone.
Create the tunnel connecting the website to our self-hosted server
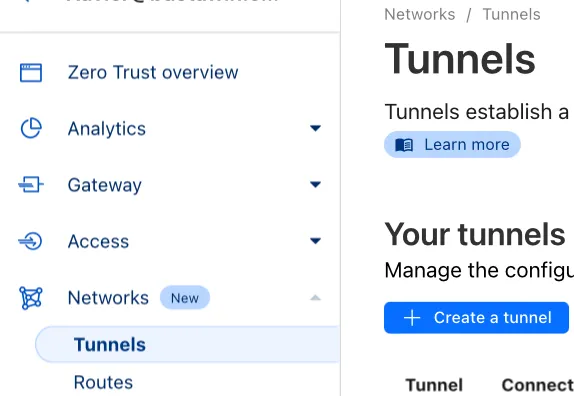
- In the Zero Trust panel, go to Networks → Tunnels → Create a
Tunnel.

Adding a tunnel - Select cloudflared, which is the technology we use in the Server.
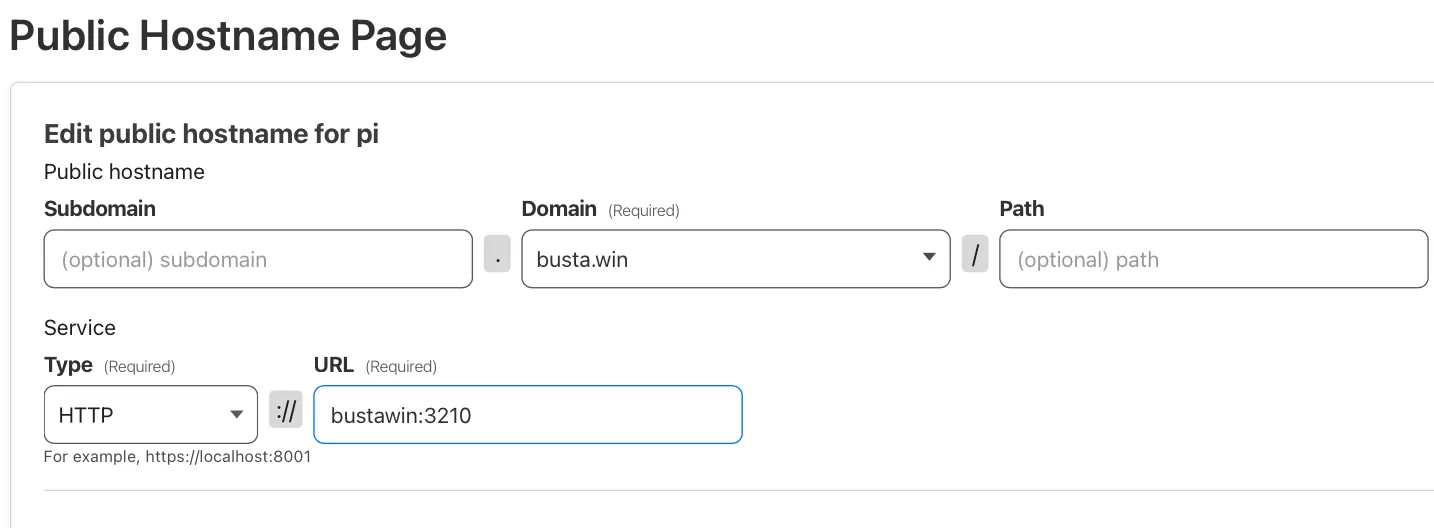
- Add the domain of the website, so Cloudflare knows what to use the tunnel for
(i.e., providing for
busta.winin my case). Thebusta.win:3210piece will make sense later.
Linking the tunnel to the busta.win domain - The next page tells you how to install Cloudflared. The most important part is to copy the token, which we use later to link the cloudflared service in our self-hosted system with what we have just set up.
Running the self-hosted website
We can use busta.win as an example of how to run a website with cloudfared via Zero Tunnel.
With Docker, the trick is in the docker-compose of the project, which I detail after:
services:
  bustawin:
    build:
      context: .
      target: start
    volumes:
      - ./posts:/app/posts

  tunnel:
    image: cloudflare/cloudflared
    command: tunnel run
    env_file:
      - .tunnel.env
This file runs two services:
- The self-hosted website itself (called
bustawin).- This service runs our Dockerfile, which runs the server at a docker’s internal network
port
of
3210.
- This service runs our Dockerfile, which runs the server at a docker’s internal network
port
of
- The cloudflared tunnel.
- The service has an
env_file: .tunnel.env, which expects us to create a file called.tunnel.envwith the token we got from Cloudflare. - In the Cloudflare website we wrote
busta.win:3210. This instructs cloudflared to link the public hostname ofbusta.winto the docker internal network port of3210.
- The service has an
So, to recap, in Cloudflare we got a token that we add in our project.
This links the project to Cloudflare’s Zero Trust.
Then, in Cloudflare we told to set the busta.win domain to the Docker’s
port of 3210, which is where our server is running—everything is linked now ✨.
So, to run the website:
- Add a
.tunnel.envfile with the Zero Trust token in the root of this project. - Start Docker and run
docker compose up.
Extras
This is just an introduction, so there are more things you can deep dive into:
- Improving the cache
By going to your website in Cloudflare’s dashbaord → Caching → Configuration you can turn on more caching features. For example, Always Online keeps delivering the cached version of our site even if our server is down, which is a real possibility for self-hosted home servers.
- Analytics
Cloudflare provides basic Analytics that are enough to start with. Go to your website’s dashboard → Analytics & Logs. When ready to upgrade, there are more powerful, self-hosted, and privacy-preserving alternatives.
- Security
Exposing anything on the Internet requires to follow good security practices.
- Keep the system up to date, ideally with automatic unattended upgrades.
- Follow security practices for the software you use.
- If using SSH to access the machine, follow practices such as removing login passwords and using Zero Conf to access the server through SSH remotely.
Conclusions
We have seen how to set up a self-hosted website using Cloudflare’s free services by using this site—busta.win—as an example.
I hope you can use this basis to build your own website 🙂.
In a future post, I will talk about the low-level architecture of the website—how React Remix works and how I structured the code.
What do you think about it? Do you have any questions or feedback? If you have any website, how do you solve this? If you don’t have a website, am I enticing you?
